Another Fusilier and a Camouflage Painting Tutorial
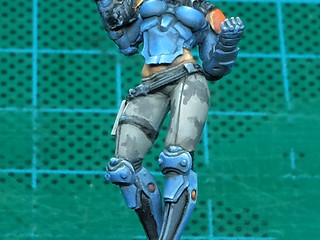
Progress toward 300 points worth of PanOceania miniatures continues with another Fusilier from the lovely Operation: Icestorm starter set.


This one took me about 3.5 hours as I slowed up a little with some of the blue blends and also took a little longer on the face and hair.
I mentioned in the comments of my last post that I would take some WIP shots as I worked up the urban camouflage and, you lucky people, I did just that. So, here we have a quick little step-by-step guide to painting some urban camouflage.
Step 1 – Pre-painting

I usually start by painting the whole area with the midtone but also shading and highlighting it as if I wasn’t going to be painting a pattern over the top. I may not be quite as smooth and tidy but it’s still useful to get those values in.
I went predominantly for a grey-brown colour that was made up of something like a 1:3 mix of Vallejo Panzer Aces Highlight German (Black) and Vallejo Model Colour Medium Sea Grey.
Step 2 – First irregular shapes
Taking a darker version of my midtone, in this case about a 1:1 ratio of those same constituent colours, I laid down some fairly large organic shapes, taking care to ensure the edges were irregular but not overly bothered if the coverage wasn’t entirely even.
You can see that I probably covered about 40% of the overall area with the darker colour here.
Step 3 – Thin black splotches

Now taking a near black colour – I’m using a wet palette so I’ve got the luxury of grabbing a bit of the previous colour and stirring in a drop of VMC black – I draw in some random spidery lines that overlap light and dark sections.
The camo is really starting to take shape now.
Step 4 – White spidery splotches

There, I got to say “white spidery splotches” again!
Ahem. Here I was basically doing exactly what I did in the previous step but this time with pure white.
To be honest, I think the white might be a bit much and I could maybe have stopped at the previous step. Given more time I would probably glaze back over with a bit of the midtone colour to flatten things back down a bit, and even go in with a darker glaze to re-emphasise the shadows and volume.
But this is meant to be a quickie, and I’m plenty pleased enough with the result given the time taken.
So there you have it, painting an urban camouflage scheme in four quick and simple steps.
Hope you found this little tutorial helpful and easy to follow. Leave me a comment and let me know! 🙂

I really like the addition of the white, so don’t regret it too much! The tutorial is also really helpful, especially with the photos at each stage. Although I think your steps renumbered themselves?
LikeLike
Thanks, Timothy. Good spot on the step numbering – copy-paste error that slipped past my “proof-reading”!
LikeLike
Damn, I could have done with a camo tutorial over the Chrimbo period.
If you think the pure white is too bold I can suggest VMC deck tan, it’s off-white without being to in-your-face.
Are these being entered at Salute? ;P
LikeLike
🙂 Probably not entering these at Salute. In fact I don’t really have any entries planned so I expect you to be all conquering!
What were you working on over the Chrimbo period then?
LikeLike
Thank you for this tutorial. Between your desert bases and this camo you are the official inspiration of my Hassassins.
LikeLike
Glad you liked the tutorial, Terrordactylyou. Good luck with your Hassassins, I’d love to see them when they’re done!
LikeLike
Wow, looks great! Will try myself. Thanks for sharing!
LikeLike
No problem, glad you liked it! 🙂
LikeLike
What color do you use for the lighter toned “cover” on the gun? Really like that look.
LikeLike
Thanks, Curtis!
Umm, it would have been pure white mostly, shaded down with some VMC Deck Tan, maybe down to VMC Medium Grey or VMC Stone grey, both of which are “warm” greys, ie there’s a bit of khaki about them!
LikeLike